Showing posts with label Christmas. Show all posts

Friday, December 7, 2012

Point of View and Ornament Link Party

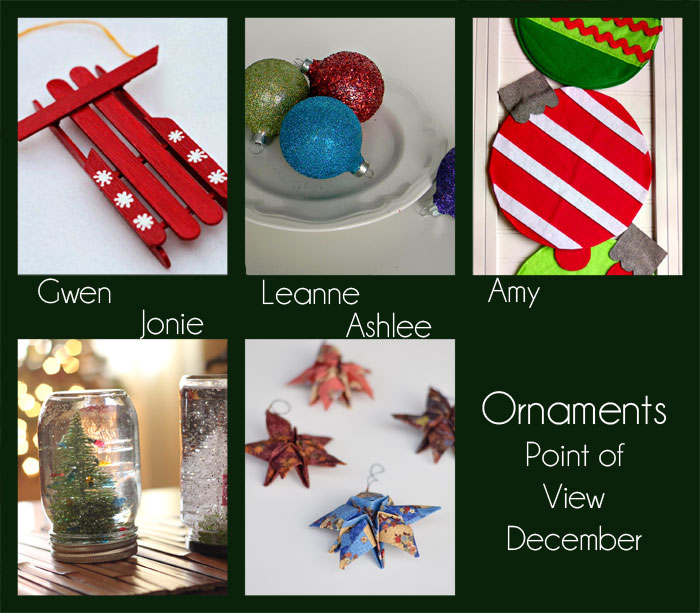
Welcome to this month's Point of View reveal! The theme this month is "Ornaments". Here are the ideas the members of Point of View came up with this month...

POV-Decemberr-2012

Gwen from Gwenny Penny (Click HERE for the tutorial for my Popsicle Stick Sled Ornament)
Leanne from Organize and Decorate Everything
Ashlee from I'm Topsy Turvy

As always, you can check out each of the projects by visiting each of the blogs listed above.

My project this month is this cute little Popsicle stick sled ornament...


I love this ornament! It's based on an ornament that my in-laws used to hang on their tree. I've always wanted to recreate it, and I don't know why I waited so long... it's so simple to put together. Click HERE for my Popsicle Stick Sled Ornament tutorial.

I want to let everyone know that I've decided that this will be my last month of Point of View. I've been a part of this group since it began back in March of 2011, and it has been such an honor to team up with these ladies every month. Thank you Amy, Jonie, Leanne, and Ashlee for everything.

Now it's your turn. Do you have an ornament that you would like to share? We would like to invite you to join the Point of View "Ornament" Link Party! It doesn't have to be a new project... If you have a project in your archives, link it up! We want to see what you've created. You can link up to the Point of View link party on any member's blog and your link will show up in the party on all five blogs! Add the Point of View button to your post so that others can join the party. And remember, by linking up you have the chance to be featured by one of the members of Point of View next week!

Gwenny Penny - Point of View
<div align="center"><a href="http://www.gwennypenny.com" title="Gwenny Penny - Point of View"><img src="http://i953.photobucket.com/albums/ae14/gwennypennyblog/SummerPoVButtonB-1.jpg" alt="Gwenny Penny - Point of View" style="border:none;" /></a></div>


Popsicle Stick Sled Ornament Tutorial

After my husband and I got married, my mother-in-law gave us a whole bunch of old Christmas ornaments. Included in the bunch was a little red sled made out of Popsicle sticks. I was more than a little excited that she gave it to us because I'd been eyeing it for several years :) I've always wanted to recreate it, and this month's Point of View theme "Ornaments" gave me a good excuse to give it a try.


I'm so happy with how this turned out. And since I'm feeling a little sad about not hosting my annual "Haul Out the Holly" holiday series this year, I thought I'd put together a tutorial for this ornament. Hope you like it :)

Materials:
  • six 4.5" Popsicle sticks (Although I should probably be saying "craft sticks" since Popsicle in trademarked.)
  • three 2.5" matchsticks (toothpicks would also work)
  • XACTO knife
  • ruler
  • glue gun
  • acrylic craft paint
  • Mod Podge
  • small paint brushes
  • 8" of embroidery floss (for hanging)
  • sandpaper (optional)
Instructions:

Step 1: Take one craft stick and cut it in half at a 45 degree angle. To do this, measure and mark the middle of your craft stick (2.25"). Mark a 45 degree angle through the center mark (I eyeballed it).


Lay your ruler along the angle mark and use it as a guide to cut through your craft stick. Take your time!


You should end up with two equal pieces with angled ends. If you'd like, gently sand the cut ends. Set these two pieces aside.


Step 2: Take another craft stick and cut it to 3.5" long with the ends cut at 45 degree angles (see photos below).


If you'd like, gently sand the cut ends. Set this piece aside.

Step 3: Cut all three matchsticks (or toothpicks) to 1.75" long each. Set aside.

Step 4: Take two whole craft sticks and the two angled pieces from Step 1. Set them up like so...


The entire width should be somewhere between 1.75" and 2". Evenly space the four pieces. The angled side pieces should be placed about 1/4" up from the bottom of the two center craft sticks.

Get out your glue gun and two of the matchsticks from Step 3. Glue one of the matchsticks to all four craft sticks near the bottom of the sled. Glue the other matchstick to all four craft sticks near the middle of the sled...


Step 5: Take your 3.5" piece from Step 2. Center it underneath the two center craft sticks, about 1/2" down from the top. Glue in place.


Step 6: Take your third matchstick from Step 3. Glue it to the two center craft sticks across the top of the sled, centering it horizontally.


Step 7: Last construction step! Time to add the sled runners. Take one of your remaining whole craft sticks and glue it standing on edge on top of all three of the matchsticks on the far left side of the sled.


Repeat with your last remaining whole craft stick on the far right side of the sled.


Step 8: Time to paint! Paint the entire sled (glue and all) with acrylic craft paint. Let dry. Embellish as desired. You could decorate it with washi tape, ribbon, stickers. I just painted on some little white snowflakes. Let dry. Mod Podge the entire ornament to seal it. Let dry.


Step 9: Take your 8" piece of embroidery floss. Glue it to the back of your sled at both ends of the 3.5" piece from Step 2.


And now you have a super cute sled ornament for your tree!


The XACTO knife and glue gun don't exactly make the construction part of this project kid friendly, but I made a couple extra and gave them to my girls to paint, which they loved. If you're looking for a fun Scout project or something to do with a small group of kids, you could easily put these together ahead of time and have them paint and decorate the sleds.


Hope you enjoyed this tutorial. If you try it out, please add pics to the Gwenny Penny Flickr Group... I'd love to see how they turn out! Happy Holidays!

Monday, November 26, 2012

Holiday Bake, Craft & Sew Along: Linen Stocking Ornament

Today you'll find me guest posting over at Skip to my Lou as part of the fantastic annual Holiday Bake, Craft and Sew Along.


Head on over to Skip to my Lou to check out my cute little linen stocking ornament tutorial.


And... I get to treat you to a SEW Amazing giveaway as part of our crafty series. This is one AMAZING giveaway! We are giving away a fabulous Prize Package worth more than $700!
One lucky winner will receive...
  • Singer ONE Sewing Machine  This is Singer's easiest sewing machine! True to SINGER, it is easy to learn on, simple and has basic stitches for crafts. The perfect machine for stitching home made goods or something fun this holiday season!
  • Simplicity SideWinder  Quickly and easily fill bobbins without having to un-thread and re-thread your sewing machine. The SideWinder transfers thread from spool to bobbin effortlessly and quickly; works with most bobbins, metal or plastic. An adjustable tension knob accommodates different thicknesses of thread! So cool!
  • Simplicity Bias Tape Maker  This Simplicity Bias Tape Maker will create customized single fold bias tape with the push of a button!
  • And so you have something beautiful to sew, $100.00 of fabric from Riley Blake!
Simply wait for RaffleCopter to load below and enter there! Be sure to check out all of the fabulous sewing projects shared during the Holiday Bake, Craft and Sew Along series going on all month long at Skip to my Lou!

a Rafflecopter giveaway

Wednesday, February 8, 2012

An Apron for My Mom

I've finally gotten around to sharing the last Christmas gift that I made this year. I made this easy, "no seams exposed" apron for my mother...


Isn't it cute? I love the long ties on it. I'm thinking I'm going to have to make one for myself soon. I followed this tutorial from Stitches in Play. This is one of those great "didn't take very long but looks like a million bucks" gifts, so I highly recommend this tutorial :) I have it pinned here if you want to add it to your pin board.


The fabrics are from Denyse Schmidt's Daisy Mae and Sugar Creek collections at Jo-Ann's. My mother's favorite color is blue, so this was a perfect choice. I added a little twill tape tag at the waistband...


Around here... we're still licking our wounds after Sunday's loss :( Next week I'll be sharing my youngest's 2nd birthday party and some gifts that I made for her. And thanks to all of the great responses I got to this post about the end of Picnik, I'm planning to put together a post on some of the alternatives that are available. Look for that later this month. Happy Wednesday!

Tuesday, December 20, 2011

Gingy Junior

Several years ago my mother bought me a giant fleece gingerbread man. I have no idea where she got it, and she can't remember buying it for me. When my oldest was about two and a half, she took quite a liking to it when it came out at Christmastime. She named her Gingy, carried her around all day, and slept with her every night for the month of December. She did the same thing last year, too. Well, I wasn't thinking about Gingy when I got out the boxes of Christmas decorations this year, but guess who was sitting right on top when we opened the first box? And guess who proceeded to fight over her for the next two hours? Yes, both my girls. This is my 22 month old's second Christmas but her first realizing that Christmas is fun. I could see that Gingy was going to be a problem, but two Gingys would take care of everything :) I went to Jo-Ann's that afternoon, and by the time I went to bed the next morning that night...


Gingy Jr was born! I love how this cutie turned out :) When the girls woke up the next morning, I brought out Gingy and Gingy Jr, and they were happy as could be. All gingerbread-induced fighting ceased. Each girl carries around her respective Gingy during the day and sleeps with her Gingy at night.


My oldest understands that Gingy goes away after Christmas and won't be back until next December, but it will be interesting to see how my youngest reacts to putting Gingy Jr in a box headed for the basement in a few weeks.


I guess it wouldn't be so bad to have a gingerbread man out all year, but I kind of like what a special treat it is at Christmastime. Fingers crossed the little one doesn't have a total meltdown :)


Have you voted in the Pink Chalk Studio Handmade With Love Tutorial Contest?
My pencil pouch is a finalist! Voting ends tomorrow, 12/21.

Sunday, December 18, 2011

Haul Out the Holly 2011 Wrap-Up

I can't believe this year's Haul Out the Holly is over already! I hope everyone enjoyed it as much as I did. A great big thank you to all of my guests... you ladies are the best! Just in case you missed any of the tutorials, here are links to all fifteen projects that were shared over the past three weeks:
The last three weeks flew by so quickly. I've been sewing. A lot of sewing. But I can't share most of it with you until after Christmas... gotta keep the presents a surprise, right? I am no where near ready for Christmas, but I am happy with what I have managed to accomplish so far. Time to cram in all the last minute shopping and sewing in preparation for next weekend. I'm sure there are many people in the same boat, so good luck this week! Oh, and here's a little peek at some awesome news I'll be sharing tomorrow :)
Related Posts with Thumbnails