Showing posts with label pillows. Show all posts

Friday, September 28, 2012

Point of View and Orange Link Party

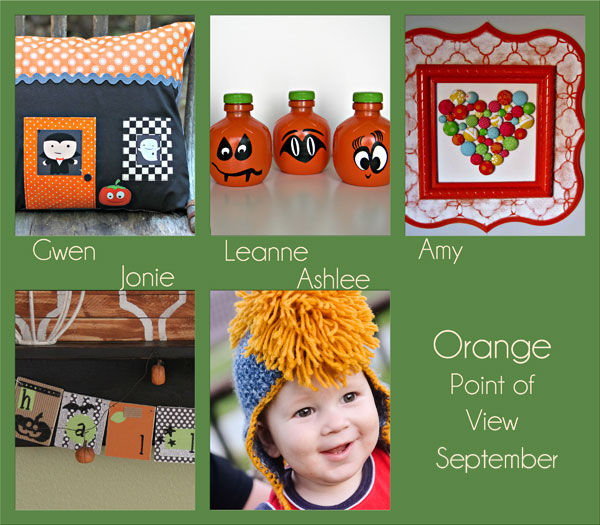
Welcome to this month's Point of View reveal! The theme for September is "Orange". Here are the "orange" ideas the members of Point of View came up with this month...

POV-September-2012

Gwen from Gwenny Penny (Click HERE to read more about my Haunted House Halloween Pillow)
Leanne from Organize and Decorate Everything
Ashlee from I'm Topsy Turvy

As always, you can check out each of the projects by visiting each of the blogs listed above.

My project this month is a pillow (For the second month is a row. Don't worry... I have no intention of trying to steal Amy's "Pillow Queen" title ;) I saw these super cute house zipper pouches by A.casa.do.Guaxinim on Flickr and thought that it would make a great pillow design. Add Dracula and a little ghost peeking out the windows and you get a little haunted house pillow for Halloween...


Click HERE to read more about my pillow.

Now it's your turn. Do you have an orange-themed/Halloween project that you would like to share? We would like to invite you to join the Point of View "Orange" Link Party! It doesn't have to be a new project... If you have a project in your archives, link it up! We want to see what you've created. You can link up to the Point of View link party on any member's blog and your link will show up in the party on all five blogs! Add the Point of View button to your post so that others can join the party. And remember, by linking up you have the chance to be featured by one of the members of Point of View next week!

Gwenny Penny - Point of View
<div align="center"><a href="http://www.gwennypenny.com" title="Gwenny Penny - Point of View"><img src="http://i953.photobucket.com/albums/ae14/gwennypennyblog/SummerPoVButtonB-1.jpg" alt="Gwenny Penny - Point of View" style="border:none;" /></a></div>


Haunted House Halloween Pillow

I've been trying to bump up the handmade Halloween decor around our house over the past couple of years (like this pillow and this embroidery hoop I made last year). When I started thinking about what to make this year, I remembered these adorable house zipper pouches by A.casa.do.Guaxinim that I had found on Flickr quite some time ago. I decided that this design would make a cute haunted house. I really didn't want to make a haunted house zipper pouch (because I wasn't sure what you'd carry in a Halloween-themed pouch), but a haunted house pillow would be perfect!


Let me add here that - thanks to my two and a half year old - I didn't get out of making a cute little non-Halloween house zipper pouch. I'll share that soon :)

The pillow is 12"x16". I absolutely love the Halloween fabric I used (Dracula, ghost, and pumpkin). It's Boo to You by My Mind's Eye for Riley Blake Designs. I've been hoarding it for two years. The little Dracula in the door window is my favorite character from the Boo to You print...


The little ghost had to make an appearance as well. I've said it before, but I can't stand the gross-out, gory, creepy side of Halloween. I'll take cutesy Halloween any day, thank you :)


The tree trunk is a birch tree print fabric I've had kicking around forever...


The back is solid grey, and I used a decorative stitch to hem the envelope closure.


I really wanted grey ric rac for this project, but I couldn't find any at Jo-Anns, and I didn't have time to order any, so I ended up mixing some black and white fabric paint and painting my white ric rac grey. It actually worked really well, so if you're in need of a specific color of ric rac, and you can't find it, try painting your own. I'm sure dying it would be the smarter thing to do, but I couldn't find any Rit dye for the life of me. I swear I used to see it everywhere, but it seems to have disappeared around here.


Anyway... fun pillow. It looks great with my Halloween pillow that I made last year. And did I mention that this month's Point of View theme is "Orange"? I added to our handmade Halloween decor and knocked out a Point of View project in one shot. Woohoo! The girls have decided that they are both going to be the same thing for Halloween this year, so getting costumes put together is the next order of business around here. I got out of making costumes last year... no such luck this year :)

Now it's your turn... Check out this month's Point of View collage and link up your past or present orange/Halloween-themed projects at the Point of View Link Party! We want to see what you've been up to!

Friday, August 24, 2012

Point of View and Family Link Party

Welcome to this month's Point of View reveal! The theme for August is "Family". Check out the great ideas the members of Point of View have come up with this month...


Gwen from Gwenny Penny (Click HERE to read more about my pillow)
Leanne from Organize and Decorate Everything
Ashlee from I'm Topsy Turvy
 
As always, you can check out each of the projects by visiting each of the blogs listed above.

My project this month is another bit of a stretch to fit the theme, but it's a pillow that I made as a birthday gift for my sister, and she's part of my family, so we're good, right? :) This pillow was designed around one particular fabric, and I really like how it all came together.


Click HERE to read more about my pillow.

Now it's your turn. Do you have a family-themed project that you would like to share? We would like to invite you to join the Point of View "Family" Link Party! It doesn't have to be a new project... If you have a family-themed project in your archives, link it up! We want to see what you've created. You can link up to the Point of View link party on any member's blog and your link will show up in the party on all five blogs! Add the Point of View button to your post so that others can join the party. And remember, by linking up you have the chance to be featured by one of the members of Point of View next week!

Gwenny Penny - Point of View
<div align="center"><a href="http://www.gwennypenny.com" title="Gwenny Penny - Point of View"><img src="http://i953.photobucket.com/albums/ae14/gwennypennyblog/SummerPoVButtonB-1.jpg" alt="Gwenny Penny - Point of View" style="border:none;" /></a></div>


Mushrooms and Pearls Pillow

I hope everyone is enjoying the last few days of summer. My oldest starts Kindergarten on Wednesday. I'm holding it together a lot better than I thought I would, but we'll see how it goes when she's actually getting on the bus next week :)

This month's Point of View theme is "Family". I had a really hard time with this theme... probably the hardest time coming up with an idea since Point of View started back in March of 2011. I finally decided to use a pillow that I made for my sister for her birthday last month. She is a member of my family, right? ;) My sister has been hinting that she wanted a pillow ever since I made this pillow for my mother a couple years ago. I wish I could have come up with a clever title for this pillow, but "Mushrooms and Pearls" is all I've got...

 
Last fall I found some Japanese linen with little rows of yellow and turquoise mushrooms. I bought it with another project in mind, but I never ended up using it. My sister has had a thing for mushrooms forever, so I decided to design the project around that fabric. The entire pillow is made of fabric from my stash. I decided to bite the bullet and use some of my coveted yellow pearl bracelet and turquoise running stitch fabrics. I'm glad I did. And this is the first time I've ever quilted a pillow. I just did some simple straight line quilting on either side of each seam.


I don't know the name of the fabric that I used for the back. I bought it to make a shirt for one of my girls but changed my mind. It matched the color scheme perfectly.


And I also finally cut into my handwriting paper fabric to create a label. Love how this turned out...
 

Now it's your turn... Check out this month's Point of View collage and link up your past or present family-themed projects at the Point of View Link Party! We want to see what you've been up to!


Thursday, December 8, 2011

HOTH Day 9: Embellished Jolly Holiday Pillow with Ameroonie Designs

I have been lovingly called the "Pillow Queen", but my real name is Amy and I blog over at Ameroonie Designs.  And while it's true that I do love to make pillows, lots and lots of pillows, I also make other things, like skirts, figurines and well, pretty much anything and everything. 


So, with that introduction, I guess it's not really a surprise that my project for this year's Haul Out the Holly event is indeed another pillow.  :)  This hand quilted, felt embellished little number will Jolly up your holidays in no time.  Head on over to Ameroonie Designs for the whole tutorial.

Thanks Gwen, for inviting me again this year.  It's a real privilege to be here among so many wonderfully talented ladies!

XOXO,
Amy

This pillow is so cute! I absolutely love it! Amy IS the "Pillow Queen", and every single one of her pillows is beautiful (Take a look at this one, this one, and this one, just to show you a few :) She's a really gifted sewist. You might also be interested in some posts she has done on selling what you make... very informative. Check out Amy's project from last year's Haul Out the Holly event... her holiday ruffle pillow. Make sure you visit Amy's blog and leave a comment on her Jolly Holiday Pillow tutorial! Amy, thanks for joining me for Haul Out the Holly again this year!


Click HERE to see more Haul Out the Holly 2011 tutorials!


Monday, October 17, 2011

Cute Halloween Pillow

Last year I bought some adorable Halloween fabric. I was going to make the girls some trick or treat bags out of it, but they have grown really fond of their $1 plastic pumpkin buckets. I got the pumpkins out last week, and they have been using them to carry their toys around all day every day. I don't have the heart to make them use anything else. I decided I'd better find another use for the fabric before another Halloween has come and gone. I went with a pillow for the couch...

{Center fabric from Boo to You by My Mind's Eye for Riley Blake Designs}

Isn't that fabric super cute? I added some strips of orange with gray pearl bracelets around the center and then gray around the outer edges. I even added piping. This is only my second time using piping and my first time on a pillow. It didn't turn out perfect, but it's not bad for my first try...


I wish I'd gone with a thicker cord so it would stand out more. Next time I'll know better. I used more of the Riley Blake fabric on the back, with a simple envelope closure...


I tried something else new on this pillow... I used one of the decorative stitches on my sewing machine for the first time. I really like the way it turned out...


One more new thing... I made a label out of twill tape and sewed it on the back of the pillow. I usually use the method that I shared in my sewing label tutorial, but I thought I'd try something new. I'm kinda liking it :)


I figured this pillow would take me a couple of hours tops, but it took more like four. I don't know why I'm so slow. I wish I could bust out two or three projects in one sitting. I suppose that's why I tend to shy away from the really big projects... they take me forever! Is anyone else a super-slow sewist, or am I the only one?


I'm linking up...

{Sew} Modern Monday at Canoe Ridge CreationsFresh Poppy Design

Friday, May 27, 2011

Point of View and Pillow Link Party!

Welcome to this month's Point of View reveal! The theme for May is "pillows", and I can't wait to show you the projects that the ladies have come up with this month. Here are the Point of View pillow-themed projects...


1. Amy from Ameroonie Designs
2. Michelle from A Little Tipsy
3. Jonie from Just Between Friends
4. Gwen from Gwenny Penny (Click HERE to find the tutorial for my Summer Pinwheel Pillow)

I love these projects! So many great and unique ideas. As always you can check out each of the tutorials by visiting each of the blogs listed above. What do you think of my Summer Pinwheel Pillow?


I love this pillow! It's so fresh and just screams summer to me.


It's a traditional pinwheel quilt block, and it's easy to put together. Want to make your own? Click HERE for the how-to.

Do you have a pillow project, past or present, that you would like to share? Whether you made up your own creation, used a pattern, or used another blogger's tutorial, we would like to invite you to join the Point of View Pillow Link Party right here on Gwenny Penny! Link up your past or present pillow projects below. Add the Point of View button to your post so that others can join the party. And remember, by linking up you have the chance to be featured by one of the members of Point of View!


Point of View: A Creative Collaboration,a creative collaboration,point of view,point of view a creative collaboration


Summer Pinwheel Pillow Tutorial

My project for the May Point of View reveal is a tutorial for a Summer Pinwheel Pillow...


I love this pillow! It's so fresh and just screams summer to me. It's a traditional pinwheel quilt block, and it's easy to put together. Want to make your own? Here's the how-to...

Materials:
  • four different scraps of fabric for the pinwheel, each measuring 5" x 5"
  • fabric for the front border and back of the pillow, about 3/4 of a yard
  • coordinating thread
  • marking pen (I used a disappearing ink pen, but it's not necessary)
  • rotary cutter or scissors
  • straightedge
  • 16" x 16" pillow form

Instructions:

Step 1: Cut your fabric. You need one 5" x 5" square of each of your four pinwheel colors. For the front border you need to cut four pieces: two pieces that are 17" x 4.75" and two pieces that are 8.5" x 4.75". This pillow has a simple envelope closure, so for the back you need to cut two pieces: one that is 17" x 14" and one that is 17" x 9".


Step 2: Take two of your 5" x 5" pinwheel pieces and place them right sides together. Pin them together, then draw a line from one point diagonally to the opposite point. You are going to sew two seams... one 1/4" to the right of this line and one 1/4" to the left. You can measure over first and draw the lines 1/4" from the center line, or just use a 1/4" piecing foot on your machine if you have one.


Step 3: After you sew your seams, cut the piece in half along the line that you originally drew from corner to corner. You will now have two triangles. Open them up, press the seams open, and snip off the extra fabric sticking out on the corners.


Step 4: Repeat Steps 2 and 3 for your other two 5" x 5" pinwheel pieces.

Step 5: Arrange your four squares to your liking.


Flip the two squares on the left side over onto the two squares on the right side so that the right sides of the fabric are facing. Pin and sew along the left edge of each using a 1/4" seam allowance.


Press the seams to opposite sides (see photo below). You want to create a nice space to perfectly "nest" your pieces together for the final seam of the pinwheel block, so if you press the seam of the top piece to the left, press the seam of your bottom piece to the right.


Step 6: With your two pieces arranged in front of you right side up, flip the bottom piece up onto the top piece so that the right sides of the fabric are facing. Pin, making sure that your seams line up (or "nest") together, and sew along the bottom edge using a 1/4" seam allowance. Press the seam open.


Your pinwheel block is done!

Step 7: Time to finish the front of the pillow. Place your pinwheel block in front of you, and set your two 8.5" x 4.75" pieces on either side of it. Flip the two side pieces onto the pinwheel block so that the right sides of the fabric are facing. Pin along both sides and sew using a 1/4" seam allowance. Press your seams open.


Step 8: Now place your two 17" x 4.75" pieces along the top and bottom of your pinwheel block. Flip the top piece down and the bottom piece up onto the pinwheel block so that the right sides of the fabric are facing. Pin along the top and bottom and sew using a 1/4" seam allowance. Press your seams open.


The front of your pillow is done!

Step 9: Moving on to the back... Take your 17" x 14" piece of fabric and press one of the 17" long edges in 1/2" to the wrong side of your fabric. Fold this edge over another 1/2" and press again. Stitch along the edge about 3/8" from the folded outer edge to finish. Repeat for your 17" x 9" piece of fabric.

Step 10: Lay the front of your pillow out right side up. Take your larger back piece and lay it on top of your pillow front right side down. Line up the raw edges of this back piece with the raw edges of the front piece


Take your smaller back piece and lay it on top of this right side down. Line up the raw edges of this back piece with the raw edges of the front piece.


Pin all layers together and sew all the way around the outside of the pillow using a 1/4" seam allowance. Clip your corners, turn your pillow right side out, and you're done!


Here's the back of my pillow. I added a patchwork strip to the larger back piece just to add a little visual interest...


And of course I added one of my homemade sewing labels...


I'm really loving this pillow, which surprises me because I'm a fan of grays and browns and black. I'm not so into using really bright colors to decorate my home, but I'm loving the combination of the bright with the gray. This pillow is definitely finding a home on my couch for the summer.

OK, now it's your turn! Click HERE to see this month's collage and to link up your past or present pillow projects at the Point of View Pillow Link Party!


I'm linking up...

monogram
Related Posts with Thumbnails