Showing posts with label Halloween. Show all posts

Friday, October 26, 2012

Point of View and Thrift Store Link Party

Welcome to this month's Point of View reveal! The theme for October is "Thrift Store". Here are the "thrift store" ideas the members of Point of View came up with this month...


Gwen from Gwenny Penny (Click HERE to read more about my Argyle Halloween Wreath)
Leanne from Organize and Decorate Everything
Kara from Happy Go Lucky (Our guest this month... thanks for joining us, Kara!)

As always, you can check out each of the projects by visiting each of the blogs listed above.

My project this month has been a long time coming. Last Halloween I saw this awesome wreath by katieshandmades (unfortunately, it looks like her Etsy shop is gone). I knew I had to make one for this year, and I'm thrilled with how mine turned out...


Click HERE to read more about my wreath.

Now it's your turn. Do you have a thrift store project that you would like to share? We would like to invite you to join the Point of View "Thrift Store" Link Party! It doesn't have to be a new project... If you have a project in your archives, link it up! We want to see what you've created. You can link up to the Point of View link party on any member's blog and your link will show up in the party on all of our blogs! Add the Point of View button to your post so that others can join the party. And remember, by linking up you have the chance to be featured by one of the members of Point of View next week!

Gwenny Penny - Point of View
<div align="center"><a href="http://www.gwennypenny.com" title="Gwenny Penny - Point of View"><img src="http://i953.photobucket.com/albums/ae14/gwennypennyblog/SummerPoVButtonB-1.jpg" alt="Gwenny Penny - Point of View" style="border:none;" /></a></div>


Argyle Halloween Wreath

I've been waiting an entire year to make this wreath. Last year, after seeing this awesome wreath by katieshandmades (unfortunately, it looks like her Etsy shop is gone), I knew I had to make one for myself. I normally wouldn't tackle a project that involves tediously wrapping yarn around an entire wreath form, but it was worth it...


And how does this wreath fit this month's Point of View theme? Well, the theme is "Thrift Store", and by some stroke of luck I walked into Goodwill a couple weeks ago and found a brand new green foam floral wreath form. I always get jealous when I hear about other bloggers finding great fabric and craft supplies at their local thrift shop because I have never been lucky enough to find that kind of stuff around here. I guess I can't complain anymore :) Add some white and orange felt, gray and black yarn, a little math, and a lot of wrapping, and you get an awesome argyle wreath!

I took about ten pictures of this wreath, then realized that it looks exactly the same from every angle, so I'll spare you having to look at the same picture over and over :) Oh, and I didn't follow a tutorial for my wreath, but if you're looking for one, I just found this tutorial from Craft Addiction.

Now it's your turn... Check out this month's Point of View collage and link up your past or present thrift store projects at the Point of View Link Party! We want to see what you've been up to!

On a side note, we are anxiously awaiting news about Hurricane Sandy (aka "Frankenstorm") possibly heading our way. After dealing with Hurricane Irene 14 months ago, I'm really hopeful that this storm weakens significantly before it gets here. Wish us luck!

Friday, September 28, 2012

Point of View and Orange Link Party

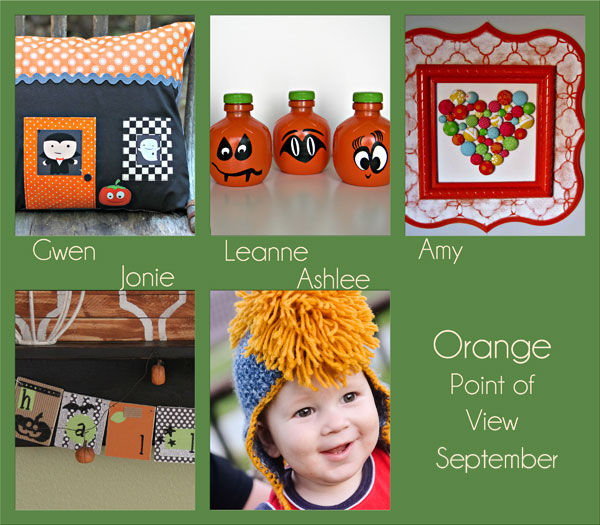
Welcome to this month's Point of View reveal! The theme for September is "Orange". Here are the "orange" ideas the members of Point of View came up with this month...

POV-September-2012

Gwen from Gwenny Penny (Click HERE to read more about my Haunted House Halloween Pillow)
Leanne from Organize and Decorate Everything
Ashlee from I'm Topsy Turvy

As always, you can check out each of the projects by visiting each of the blogs listed above.

My project this month is a pillow (For the second month is a row. Don't worry... I have no intention of trying to steal Amy's "Pillow Queen" title ;) I saw these super cute house zipper pouches by A.casa.do.Guaxinim on Flickr and thought that it would make a great pillow design. Add Dracula and a little ghost peeking out the windows and you get a little haunted house pillow for Halloween...


Click HERE to read more about my pillow.

Now it's your turn. Do you have an orange-themed/Halloween project that you would like to share? We would like to invite you to join the Point of View "Orange" Link Party! It doesn't have to be a new project... If you have a project in your archives, link it up! We want to see what you've created. You can link up to the Point of View link party on any member's blog and your link will show up in the party on all five blogs! Add the Point of View button to your post so that others can join the party. And remember, by linking up you have the chance to be featured by one of the members of Point of View next week!

Gwenny Penny - Point of View
<div align="center"><a href="http://www.gwennypenny.com" title="Gwenny Penny - Point of View"><img src="http://i953.photobucket.com/albums/ae14/gwennypennyblog/SummerPoVButtonB-1.jpg" alt="Gwenny Penny - Point of View" style="border:none;" /></a></div>


Haunted House Halloween Pillow

I've been trying to bump up the handmade Halloween decor around our house over the past couple of years (like this pillow and this embroidery hoop I made last year). When I started thinking about what to make this year, I remembered these adorable house zipper pouches by A.casa.do.Guaxinim that I had found on Flickr quite some time ago. I decided that this design would make a cute haunted house. I really didn't want to make a haunted house zipper pouch (because I wasn't sure what you'd carry in a Halloween-themed pouch), but a haunted house pillow would be perfect!


Let me add here that - thanks to my two and a half year old - I didn't get out of making a cute little non-Halloween house zipper pouch. I'll share that soon :)

The pillow is 12"x16". I absolutely love the Halloween fabric I used (Dracula, ghost, and pumpkin). It's Boo to You by My Mind's Eye for Riley Blake Designs. I've been hoarding it for two years. The little Dracula in the door window is my favorite character from the Boo to You print...


The little ghost had to make an appearance as well. I've said it before, but I can't stand the gross-out, gory, creepy side of Halloween. I'll take cutesy Halloween any day, thank you :)


The tree trunk is a birch tree print fabric I've had kicking around forever...


The back is solid grey, and I used a decorative stitch to hem the envelope closure.


I really wanted grey ric rac for this project, but I couldn't find any at Jo-Anns, and I didn't have time to order any, so I ended up mixing some black and white fabric paint and painting my white ric rac grey. It actually worked really well, so if you're in need of a specific color of ric rac, and you can't find it, try painting your own. I'm sure dying it would be the smarter thing to do, but I couldn't find any Rit dye for the life of me. I swear I used to see it everywhere, but it seems to have disappeared around here.


Anyway... fun pillow. It looks great with my Halloween pillow that I made last year. And did I mention that this month's Point of View theme is "Orange"? I added to our handmade Halloween decor and knocked out a Point of View project in one shot. Woohoo! The girls have decided that they are both going to be the same thing for Halloween this year, so getting costumes put together is the next order of business around here. I got out of making costumes last year... no such luck this year :)

Now it's your turn... Check out this month's Point of View collage and link up your past or present orange/Halloween-themed projects at the Point of View Link Party! We want to see what you've been up to!

Wednesday, October 26, 2011

Pin It Wednesday: Halloween


Halloween is almost here. I took the easy way out this year and stayed away from handmade costumes. Last year's Pillsbury Doughboy did me in... maybe next year :) I thought I'd throw together a few of my favorite Halloween pins to share with you. Here are this week's pins...


Take ordinary paper lanterns and turn them into these beautiful pumpkins using paper, floral tape, and pipe cleaners. I love the way it looks with several displayed together.

I have been a big fan of this pillow ever since Amy posted it last year. I love the black on black. It's simple, but it makes a statement. I will get one of these made someday. It would complement the bats in my dining room nicely :)

These little trick or treat bags are adorable. I love the fabrics that Chris used. I'm not a fan of the spooky side of Halloween, so this little kitty is perfect. Chris shares the cat applique design and a candy corn design, too.

These super-cute plush decorations are irresistible. You can't help but smile when you look at them. Best part? There is a free pattern and instructions available for download!


To see all of my Halloween pins, click HERE. Interested in seeing all of my Pinterest boards? Click HERE.

Monday, October 24, 2011

Boo!

I have finally made something that I pinned on Pinterest (from So Sarah Sews). It's cute and simple, and I love it. It's also a super-quick Halloween decoration to put together...


Isn't it cute? It's tiny, too... a 4" embroidery hoop. Add a little black cotton, some white embroidery floss, and you're good to go.


Each time I do an embroidery project I realize just how much I enjoy embroidery. I really need to find more ways to incorporate embroidery into my sewing projects. Speaking of which, have you seen these free fall embroidery patterns from Wild Olive? Adorable!


I'm linking up...

Tuesday, October 18, 2011

Bats!

They've taken over our dining room...


When I saw this idea on MADE last Halloween, I knew I wanted to try it. I put it off last year because I couldn't get motivated to cut out that many bats. I decided to do it on the spur of the moment this year. My four year old and I gathered every piece of black construction paper we had in the house. We had enough to make thirty bats, and the cutting actually went pretty quickly. I folded three sheets together so I could cut three bats at a time. It probably took longer for me to put them up on the wall than it did to cut them out.


I didn't even think about it until the bats were up on the wall, but our old "beware of trespassing" sign looks pretty spooky with bats flying over it...


That's all I've got for new Halloween decor this year. I have a couple of projects I'd like to squeeze in, but we'll see if I actually get them done. One handmade decoration that I didn't share last year was my Halloween bunting...


I just sewed triangles of fabric onto pieces on black felt and sewed them all to a ribbon. I made this to fit the fireplace in our previous house, so it's a little short for the mantel in our dining room now, but I think it looks alright. I like how bright and bold the colors are compared to everything else in the space.

The girls and I did a little Halloween art project last week, too. They were supposed to make spiders out of handprints, but they just ended up smearing black paint everywhere...


Doesn't matter... they had fun :)

Monday, October 17, 2011

Cute Halloween Pillow

Last year I bought some adorable Halloween fabric. I was going to make the girls some trick or treat bags out of it, but they have grown really fond of their $1 plastic pumpkin buckets. I got the pumpkins out last week, and they have been using them to carry their toys around all day every day. I don't have the heart to make them use anything else. I decided I'd better find another use for the fabric before another Halloween has come and gone. I went with a pillow for the couch...

{Center fabric from Boo to You by My Mind's Eye for Riley Blake Designs}

Isn't that fabric super cute? I added some strips of orange with gray pearl bracelets around the center and then gray around the outer edges. I even added piping. This is only my second time using piping and my first time on a pillow. It didn't turn out perfect, but it's not bad for my first try...


I wish I'd gone with a thicker cord so it would stand out more. Next time I'll know better. I used more of the Riley Blake fabric on the back, with a simple envelope closure...


I tried something else new on this pillow... I used one of the decorative stitches on my sewing machine for the first time. I really like the way it turned out...


One more new thing... I made a label out of twill tape and sewed it on the back of the pillow. I usually use the method that I shared in my sewing label tutorial, but I thought I'd try something new. I'm kinda liking it :)


I figured this pillow would take me a couple of hours tops, but it took more like four. I don't know why I'm so slow. I wish I could bust out two or three projects in one sitting. I suppose that's why I tend to shy away from the really big projects... they take me forever! Is anyone else a super-slow sewist, or am I the only one?


I'm linking up...

{Sew} Modern Monday at Canoe Ridge CreationsFresh Poppy Design

Thursday, October 6, 2011

Printable: Color Your Own Halloween Paper Dolls

Last fall I had a bunch of requests for a black and white version of my Halloween Paper Dolls printable so that kids can color the dolls and costumes themselves. It took me about a year to get around to doing it, but I've finally done it...


At least I got it done before Halloween came around again, right? :)


I think people figured it was just a matter of deleting the color from the original version, but it was more complicated than that. The fill colors were hiding overlapping lines that I needed to cover or erase to make the black and white version. It took some time, but I'm glad I did it. My oldest was happy to get her hands on them...


Same six costumes as the color version: superhero (boy and girl), pirate, fairy, Frankenstein, and princess.


Click HERE to download the Color Your Own Halloween Paper Dolls PDF.

Instructions: Print on white cardstock at 100% (no scaling). Color paper dolls and costumes. Carefully cut out each paper doll, base, and costume. Cut slits in bases on solid black lines. Fold stand bases on dotted line. Match up slits in doll bases and stand bases to assemble. Fold back all costume tabs to dress dolls.

Tip: Last year several people attached magnets to the paper dolls and costumes so kids could play with them on the fridge. It makes it much easier for younger children to dress up these dolls when they don't have to use the little tabs :)

All printables are for personal, non-commercial use only. Thank you!

Last year I also had some requests for non-Halloween clothing for the paper dolls... uh... :) What can I say? I've found that my creative interests have moved away from the printables. That doesn't mean that I'll never make them... maybe I'll surprise you one day ;)

Enjoy!


I'm linking up...

monogramA Crafty SoireePhotobucket
Related Posts with Thumbnails