

Round up these supplies:
template for mouse (download here)
cardstock paper
scissors
erasable fabric marker (mine was water soluble)
felt scraps (any blend of wool or man made material)
graph paper (any gauge will work)
fine tipped Sharpie pen or something similar (in a dark color)
7 inch wooden embroidery hoop
Scotch tape
pencil
a window
10in. x 10in. (roughly) piece of fabric
embroidery floss
embroidery needle
pins
craft glue
Download and print the template for the mouse. It's easier to trace if you print it onto cardstock, but regular paper will do in a pinch.
Open a Word document and type the words using the font "CAC Shishoni Brush" at size 65. In case you missed it, the words are "not a creature was stirring." Print the words out onto regular paper.
Cut out the mouse body pieces (the three raindrop shapes) and the words.

Trace the mouse body pieces onto your felt using the fabric marker. You can choose any colors you like. I went with a heather brown for the body and ears and a light pink for the inner parts of the ears. You'll need one body piece and two of each ear piece.
Cut out each raindrop shape and remove any tracing marks. Set them aside.

Draw a circle on your graph paper by tracing around the inside of your embroidery hoop with a dark-colored pen.

Tape your piece of graph paper to a window. I've heard that there is such a thing as a light box for tracing purposes, but since I don't have anything fancy schmancy like that, I use a window. Oh, and make sure there's daylight outside!
Tape the words and the mouse body piece how you want them to be laid out within the circle. I chose to do the words near the top (using the graph paper lines as a guide so that nothing was crooked) and the mouse near the bottom. Just be sure to leave some space on either side of the mouse for his ears and whiskers. The tape peels off easily so you can adjust things as you go.
Pencil in a mouse tail. I chose to make mine cross over the letter "g" - but you feel free to make your little mouse's tail do whatever it wants. When you're happy with the tail, trace over it with a fine tipped pen.

Iron your fabric and tape it over the graph paper on the window. Tape all four corners and add a couple of pieces of tape to each side to keep the fabric from shifting while you're tracing.

Trace the entire design (the outer circle, the mouse body and tail, the words) onto the fabric using the fabric marker. When you're done tracing, remove everything from the window and make sure your fabric is tape-free.

Trace a circle about 2" outside of your original circle. I happened to have a larger embroidery hoop, so that's what I used. It doesn't have to be a perfect circle by any means.
Cut along the large circle that you just made. I used pinking shears, but regular scissors will do.
Secure your fabric in your embroidery hoop. The traced circle should act as a rough guide so you can center your design. Check to make sure that it's still centered when it hangs by quickly hanging it on the wall. It'll hook onto any nail or tack.

Stitch the letters. I used 4 strands of a dark pink embroidery floss (DMC 3731) and a back stitch. I think a stem stitch would look really nice, but alas, I know not how to do that one. Make sure not to embroider the part of the tail that crosses over the letter "g." See the photo below for more detail.

Stitch the mouse tail. I used 4 strands of a dark brown embroidery floss (DMC 838) and a whipped back stitch.

Attach the mouse body. Pin the felt body piece onto your fabric, using the traced raindrop shape as a guide. I used a running stitch and 2 strands of a light brown embroidery floss (almost matching the color of felt) but I don't know the color code because it was part of my thread scraps. What? Doesn't everyone have a nest of random lengths and colors of thread that they can't throw away because they might need them some day?
Leave some space at the point of the raindrop shape for embroidering the nose later. See the photo below for more detail.

Erase all the leftover tracing marks. I used a squirt bottle to lightly mist any visible marks with water. Set it aside to dry while you work on the ears. To speed up drying you can prop it up near a heater vent or use a low setting on your hair dryer...or just be patient. It really doesn't take very long.

Assemble the ears by pinning the smallest raindrop shape to the larger raindrop shape. I used 2 strands of a light pink embroidery floss (almost matching the color of the felt) and a running stitch. Again, it was a scrap thread so I don't know the color code. Don't judge.

Pinch the point of the ear between your thumb and pointer finger.
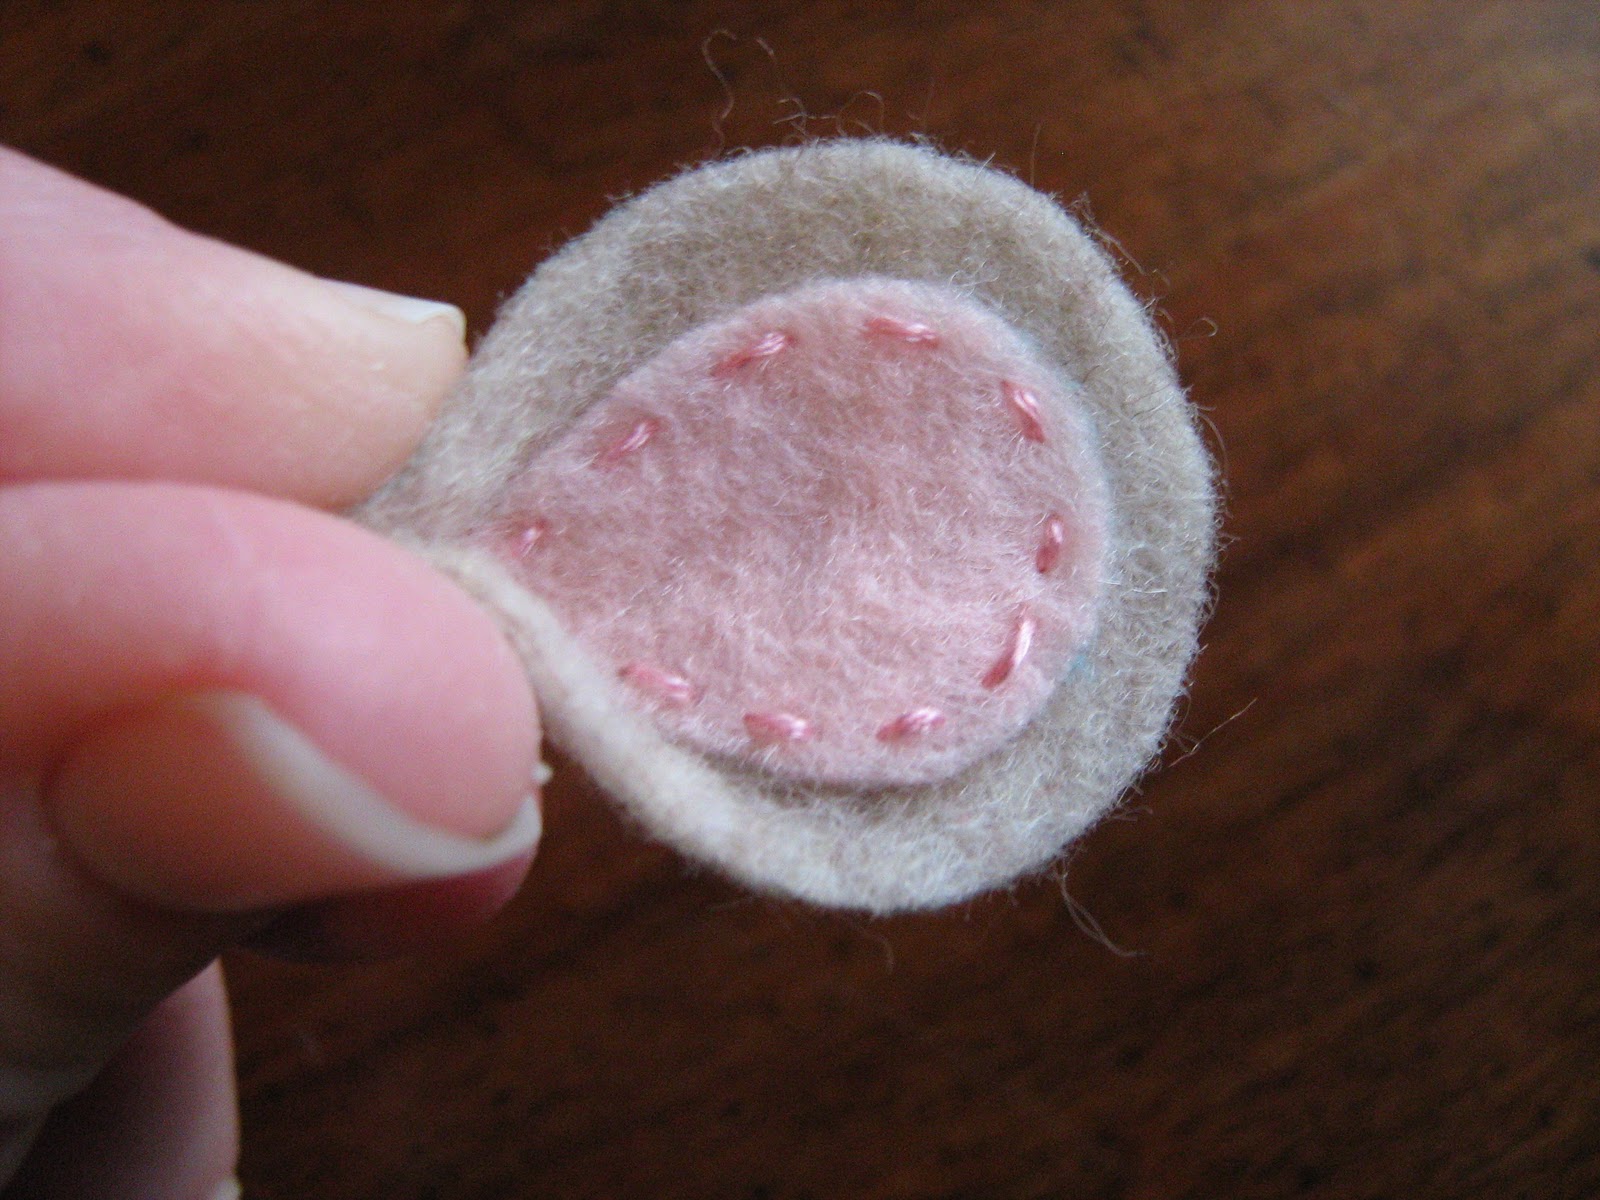
With your free hand, pass a needle with 1 strand of brown embroidery floss (to match the felt) through both layers of outer ear felt (the larger raindrop shape). Start at the bottom and go up through the top, leaving a tail of thread. Then turn your needle and go down from the top and through the bottom. That's probably confusing to read, but hopefully the photo below will clear it up. Basically, you're just trying to discretely secure that pinched shape.

Knot together the two strands of embroidery floss that are dangling from the bottom of the pinched ear.
Use some really sharp scissors to snip off the excess embroidery floss and the bit of felt just below the stitches you made.

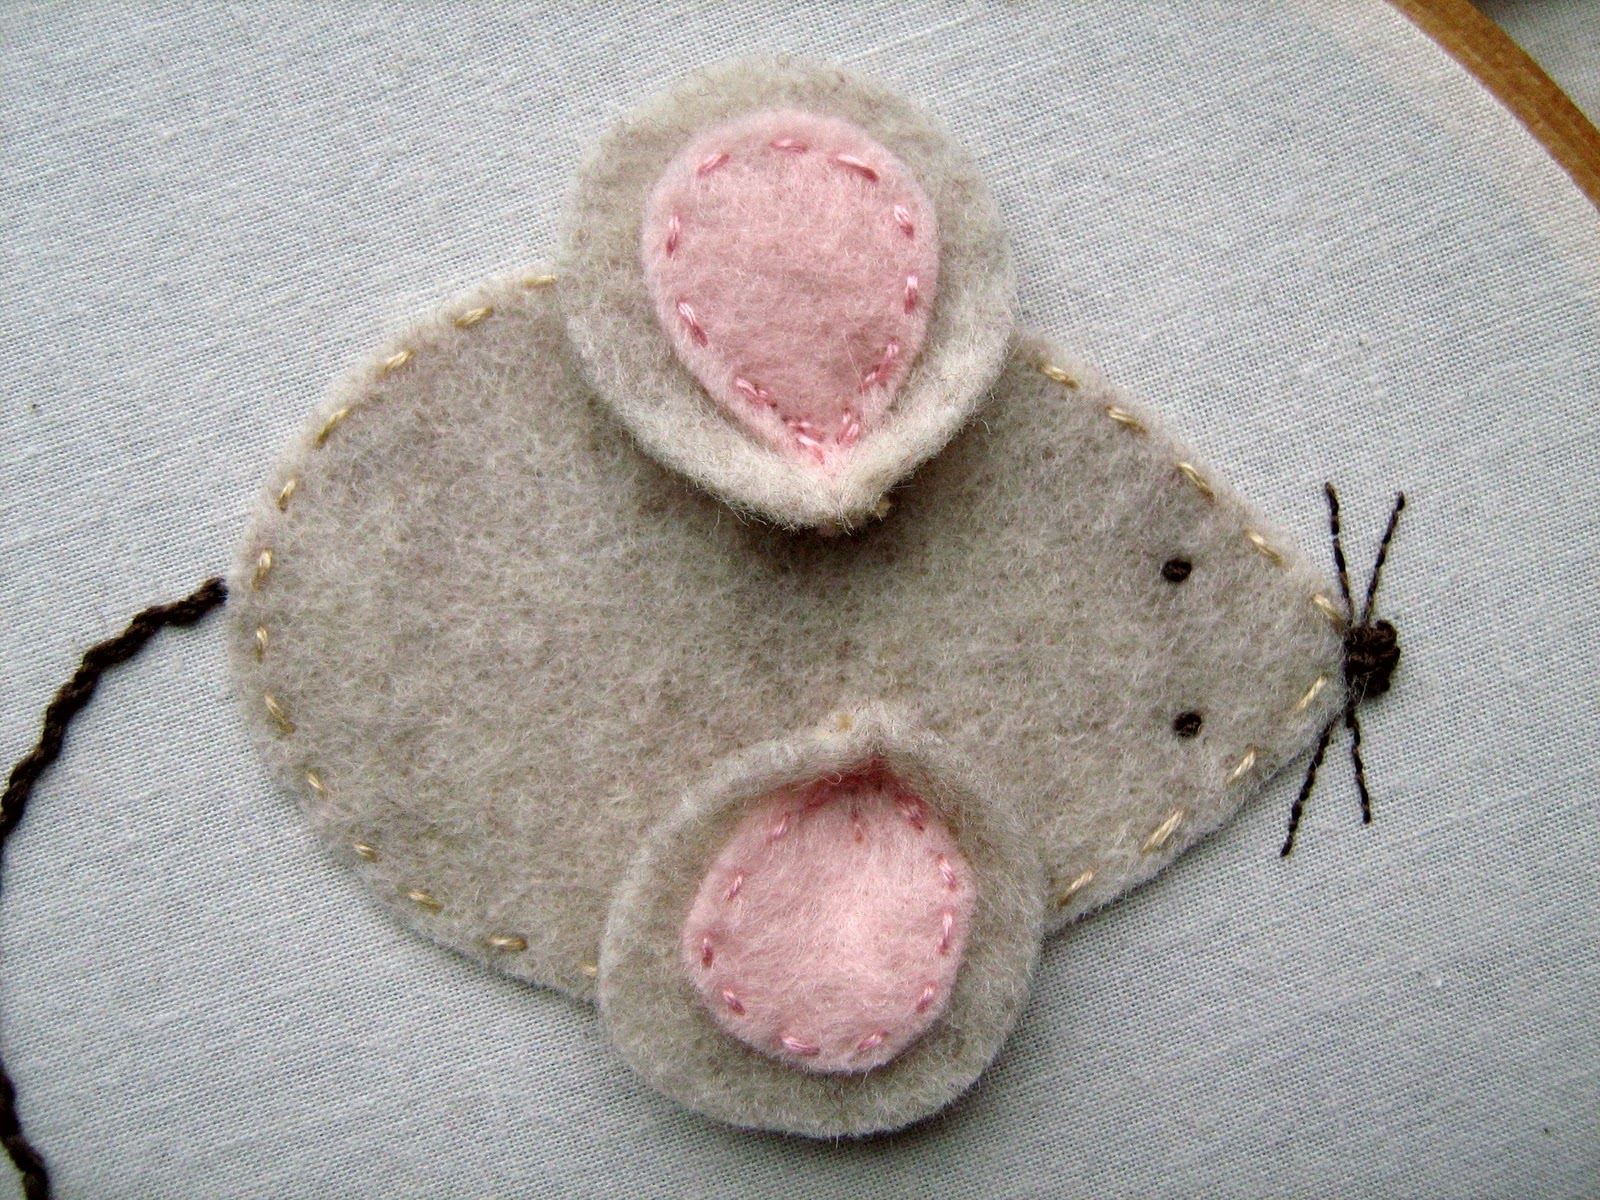
Pin an ear on each side of the mouse body and stitch them into place with 1 strand of embroidery floss to match the smallest raindrop shape. I stitched a three-pronged shape right at the pointed end of the raindrop. You should be able to see it in the photo below.

Now it's time to stitch on the face! For stitching each facial feature, I used the same dark brown embroidery floss that I used to make the tail. With your fabric pen, draw an elongated "x" shape across the tip of the nose (or where the nose will be pretty soon). Use 1 strand of embroidery floss and back stitch the whiskers. Use 4 strands to make a cluster of french knots at the tip of the raindrop shape, overlapping some of the whisker stitches.
Use 3 strands to make one french knot for each eye.

There you have it! Your finished mouse in all it's fuzzy felt splendor!
Now that the embroidery is done, let's secure the fabric to the back of the hoop and make everything look neat and tidy. Trim about half of the excess fabric off. You just need enough left over to fold to the back of the hoop and glue down, a little more than 1/4 inch.

Make a line of glue about 2 inches long along the wooden part on the back of the hoop. Fold over the fabric and press it down onto the glue. There will be little creases in the fabric, but it'll be smooth enough to hang flat on the wall. Work around the hoop in 2 inch sections, making sure that each section is secure/dry before you move on to the next.

Now you've got a nice little wall hanging!

You can either call it quits here or continue on and add some embellishments around the hoop to kind of frame it in. You might add some coordinating ribbon around the flat sides or some buttons and felt stars, like I did. Just use your craft glue to attach them to the hoop/fabric.

Now you're done and you have the cutest little Christmas decoration to keep or give away ('tis the season, you know).


This is so sweet. I just love the little mouse. I can just picture using this idea to capture other verses, such as "The stockings were hung by the chimney with care" or "While visions of sugarplums danced in their heads." Everything Megan creates over at Fowl Single File is absolutely adorable. Her Fleece Counting Sheep Bean Bags are my favorite, but she has also made some amazing cupcakes and cakes, and her crochet projects are too cute. Megan, thank you so much for sharing your Christmas embroidery hoop with us today! I hope everyone enjoyed Haul Out the Holly as much as I did!


10 comments:
Precious. I just recently returned to stitchery so this is right up my alley. Absolutely beautiful - a perfect family heirloom.
He is the most georgeous little mouse, just love his little tear drop ears!
Thank you, Gwen, for hosting Haul Out the Holly and for letting me take part in it!
Super cute.
Oh, this darling. What a sweet and simple sampler!
Oh so cute! And that graph paper trick... so smart. I need to do that!
Totally, totally adorable! Love it!
So Adorable! Another great tutorial!
How darling, I love the cute little mouse ears, those totally make it for me!
Just beautiful...thank you
Post a Comment
Note: Only a member of this blog may post a comment.