

I don’t wear aprons very often, but maybe that’s because I don’t have one that I really like. I’ve had this idea for an apron rolling around in my brain for a while, but I just couldn’t find the right fabric for it. Then I came across a remnant of this at the fabric store:

I absolutely love this apron… I may never take it off. It is reversible and has a completely different look on each side.


Materials you will need:
- Cotton for front of apron and pocket on back – 2/3 yard
- Linen for back of apron and trim on front – 2/3 yard
- Cotton for waistband/ties and pocket binding – 1 fat quarter
- Jumbo rick rack – about 50"
- Fusible interfacing – ½ yard
- Thread to match your cotton front, linen back, and waistband/tie fabrics
Part I: Assembling the front (cotton side)
Step 1: Wash all of your fabric before cutting. This is really important for this project because you are sewing cotton to linen. Linen should be washed three times before it is cut.
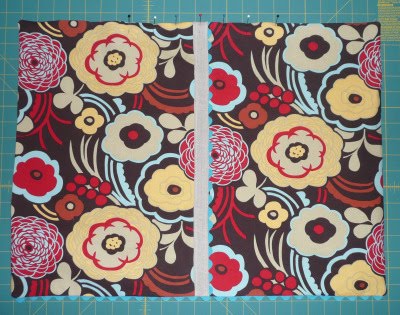
Step 2: Cut your cotton for the front of your apron to 18" x 24". Cut a strip of linen 1¾" x 18". Cut a piece of jumbo rick rack 18" long. Cut a piece of fusible interfacing slightly smaller than your cotton, and iron it onto the wrong side of the cotton.
Step 3: Take your strip of linen, and fold in one of the long edges to the center of the strip. Using a press cloth, iron the fold down the entire length of the strip. Fold the other long edge into the center and iron the fold down the entire length of the strip.

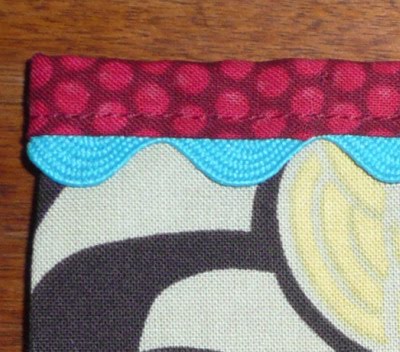
Step 4: Take your cotton apron front and lay it right side up on the table with the longer edge (24") running horizontally. Find the center of your cotton fabric, and place the pressed linen strip (folded side down) down the center of the cotton. Place your piece of rick rack under the right side of the linen strip so that half of the width of the rick rack sticks out from under the linen strip. Pin the linen and rick rack to the cotton. Topstitch down both sides of the linen strip about 1/8" from each edge.


Part II: Assembling the back (linen side)
Step 5: Cut your linen for the back of your apron to 18" x 24". Cut a piece of cotton 6" x 6" for your pocket. Cut a strip of cotton 1¾" x 8" for your pocket binding. Cut a piece of jumbo rick rack 7" long for your pocket trim. Cut a piece of fusible interfacing slightly smaller than your pocket, and iron it onto the wrong side of the pocket.
Step 6: Take your pocket and place it right side down. Press all four edges in about ¼", making sure to miter the corners. (Not sure how to do that? See photos 4 and 5 here.)

Step 7: Take your strip of pocket binding fabric and place it right side down. Fold in one of the long edges to the center of the strip. Iron the fold down the entire length of the strip. Fold the other long edge into the center and iron the fold down the entire length of the strip. Now fold the entire strip in half lengthwise and iron flat.


Center the binding over one edge of the pocket. Take the 7" piece of rick rack and place it under the binding on the front of the pocket. Pin the binding and rick rack to the pocket. Sew the binding and rick rack onto the pocket about 1/8" from the bottom edge of the binding.

Step 8: Place your trimmed pocket on your linen apron back about 2½" in from the left edge and 6" down from the top. Tuck in the excess binding and rick rack on each side of the pocket. Pin the pocket in place and sew the pocket onto the linen on the sides and bottom about 1/8" from the edges of the pocket. Backstitch several times when you sew over the binding on both the left and right sides of the pocket.

Part III: Assembling the apron
Step 9: Place the completed front of your apron right side up on the table. Cut a piece of rick rack 24" long. Pin the rick rack to the front side of your apron about ¾" up from the bottom. Baste the rick rack to your cotton front, making sure to sew right down the middle of the rick rack.


Step 10: Place your apron front (cotton) and apron back (linen) together with right sides facing. Align your edges and pin together. With the cotton side up, sew with a tight stitch right over the basted seam that you just made over the rick rack.
Step 11: Sew around the other three sides of your apron about ¼" from the edge, leaving a 6" gap at the top for turning. Clip the corners, trim excess fabric around the edges (but don’t cut into the rick rack) and turn the apron right side out.
Step 12: Press the entire apron, making sure to press in the edges of the gap in the top. Pin the gap closed. Topstitch all the way around the edges of the apron about 1/8" from the edges.


Step 13: For your waistband/ties, you need a strip of fabric that is 3½" x 90". To do this, cut several shorter pieces from your fat quarter (I used 5 pieces) and sew them together to get a 90" strip. Fold the 90" strip in half lengthwise with right sides facing. Press. Find the exact center of the strip, and mark 12" to either side of the center using pins. When you sew the strip, DO NOT sew between these pins. This will leave a 24" gap in the center for inserting your apron later.


Step 15: Clip the corners. Using the gap, turn the waistband/ties right side out. Press the entire strip, making sure to press in the edges of the 24" gap.

Step 16: Place the top edge of your apron inside the gap in the waistband. Pin in place. Sew the waistband to the apron about 1/8" up from the bottom edge of the waistband, making sure to backstitch at the beginning and the end, closing the entire gap.


Congratulations! You’re done! Now go cook something delicious in your cute new apron!


Thanks for stopping by today! I hope you enjoyed the apron tutorial. Please feel free to email me if you have any questions. I’m linking up this tutorial at the following link parties:
 |  |  |  |  |
 |  |  |
 |  |  |


12 comments:
Very cute! I own more aprons than I have friends, and I'm really digging your design! It would make great Christmas gifts for friends (I've made an apron for all of my friends this year). Incidentally, I don't ever WEAR them, they are too cute. :O)
I love aprons and love jumbo ricrac. Great design and tutorial. Very clear. Well done!! (that remnant was a score!)
I love your apron! The fabric is so cute! I am tempted to get my sewing machine out and make one, thanks for the great tutorial!
I do love your fabric choices and the fact that each side is so different! This is a fun and sophisticated apron...and that's very important when you're cooking, right?
Love the apron. When do I get mine?
Cute apron! I love that it's reversible! Thanks for linking @Creative Itch's "Sew Cute Tuesday"!
Your apron is sooo cute! Seriously, I love the fabric choices and the pattern!
This is adorable! I love the ric rac:)
LOVE THIS!!! I am bookmarking it for sure. I love that it's so simple to make and looks so much better than those bulky aprons that wrap around your neck. I will be making this soon!
I love love love it - the fabric you chose, the classic styling....I could wear that everyday too. Great tutorial - this might just be on my to do list this winter.
Great tute Gwen, so many helpful pictures! I love how it came out the fabric choice was great and it's awesome how it's double sided! Thank you for joining us at A Crafty Soiree again. See you next week:)
Hey there Gwen! I featured your apron tutorial on my blog today!
http://theadventuresofroryandjess.blogspot.com/2011/03/apron-tutorial-round-up.html
Thanks for the tutorial and inspiration!
Jess
Post a Comment
Note: Only a member of this blog may post a comment.