Sunday, May 29, 2011

We Have a Winner!

Thanks to everyone who entered the It's My Party and I'll Craft if I Want To giveaway!


The winner is...

Catherine from Avery and Winslow who said...


Congratulations, Catherine! I sent Catherine an email this morning. If I don't hear back from her by Wednesday, June 1st at 7:00am (EST), I will choose another winner. I hope everyone has a great Memorial Day weekend!

Friday, May 27, 2011

Point of View and Pillow Link Party!

Welcome to this month's Point of View reveal! The theme for May is "pillows", and I can't wait to show you the projects that the ladies have come up with this month. Here are the Point of View pillow-themed projects...


1. Amy from Ameroonie Designs
2. Michelle from A Little Tipsy
3. Jonie from Just Between Friends
4. Gwen from Gwenny Penny (Click HERE to find the tutorial for my Summer Pinwheel Pillow)

I love these projects! So many great and unique ideas. As always you can check out each of the tutorials by visiting each of the blogs listed above. What do you think of my Summer Pinwheel Pillow?


I love this pillow! It's so fresh and just screams summer to me.


It's a traditional pinwheel quilt block, and it's easy to put together. Want to make your own? Click HERE for the how-to.

Do you have a pillow project, past or present, that you would like to share? Whether you made up your own creation, used a pattern, or used another blogger's tutorial, we would like to invite you to join the Point of View Pillow Link Party right here on Gwenny Penny! Link up your past or present pillow projects below. Add the Point of View button to your post so that others can join the party. And remember, by linking up you have the chance to be featured by one of the members of Point of View!


Point of View: A Creative Collaboration,a creative collaboration,point of view,point of view a creative collaboration


Summer Pinwheel Pillow Tutorial

My project for the May Point of View reveal is a tutorial for a Summer Pinwheel Pillow...


I love this pillow! It's so fresh and just screams summer to me. It's a traditional pinwheel quilt block, and it's easy to put together. Want to make your own? Here's the how-to...

Materials:
  • four different scraps of fabric for the pinwheel, each measuring 5" x 5"
  • fabric for the front border and back of the pillow, about 3/4 of a yard
  • coordinating thread
  • marking pen (I used a disappearing ink pen, but it's not necessary)
  • rotary cutter or scissors
  • straightedge
  • 16" x 16" pillow form

Instructions:

Step 1: Cut your fabric. You need one 5" x 5" square of each of your four pinwheel colors. For the front border you need to cut four pieces: two pieces that are 17" x 4.75" and two pieces that are 8.5" x 4.75". This pillow has a simple envelope closure, so for the back you need to cut two pieces: one that is 17" x 14" and one that is 17" x 9".


Step 2: Take two of your 5" x 5" pinwheel pieces and place them right sides together. Pin them together, then draw a line from one point diagonally to the opposite point. You are going to sew two seams... one 1/4" to the right of this line and one 1/4" to the left. You can measure over first and draw the lines 1/4" from the center line, or just use a 1/4" piecing foot on your machine if you have one.


Step 3: After you sew your seams, cut the piece in half along the line that you originally drew from corner to corner. You will now have two triangles. Open them up, press the seams open, and snip off the extra fabric sticking out on the corners.


Step 4: Repeat Steps 2 and 3 for your other two 5" x 5" pinwheel pieces.

Step 5: Arrange your four squares to your liking.


Flip the two squares on the left side over onto the two squares on the right side so that the right sides of the fabric are facing. Pin and sew along the left edge of each using a 1/4" seam allowance.


Press the seams to opposite sides (see photo below). You want to create a nice space to perfectly "nest" your pieces together for the final seam of the pinwheel block, so if you press the seam of the top piece to the left, press the seam of your bottom piece to the right.


Step 6: With your two pieces arranged in front of you right side up, flip the bottom piece up onto the top piece so that the right sides of the fabric are facing. Pin, making sure that your seams line up (or "nest") together, and sew along the bottom edge using a 1/4" seam allowance. Press the seam open.


Your pinwheel block is done!

Step 7: Time to finish the front of the pillow. Place your pinwheel block in front of you, and set your two 8.5" x 4.75" pieces on either side of it. Flip the two side pieces onto the pinwheel block so that the right sides of the fabric are facing. Pin along both sides and sew using a 1/4" seam allowance. Press your seams open.


Step 8: Now place your two 17" x 4.75" pieces along the top and bottom of your pinwheel block. Flip the top piece down and the bottom piece up onto the pinwheel block so that the right sides of the fabric are facing. Pin along the top and bottom and sew using a 1/4" seam allowance. Press your seams open.


The front of your pillow is done!

Step 9: Moving on to the back... Take your 17" x 14" piece of fabric and press one of the 17" long edges in 1/2" to the wrong side of your fabric. Fold this edge over another 1/2" and press again. Stitch along the edge about 3/8" from the folded outer edge to finish. Repeat for your 17" x 9" piece of fabric.

Step 10: Lay the front of your pillow out right side up. Take your larger back piece and lay it on top of your pillow front right side down. Line up the raw edges of this back piece with the raw edges of the front piece


Take your smaller back piece and lay it on top of this right side down. Line up the raw edges of this back piece with the raw edges of the front piece.


Pin all layers together and sew all the way around the outside of the pillow using a 1/4" seam allowance. Clip your corners, turn your pillow right side out, and you're done!


Here's the back of my pillow. I added a patchwork strip to the larger back piece just to add a little visual interest...


And of course I added one of my homemade sewing labels...


I'm really loving this pillow, which surprises me because I'm a fan of grays and browns and black. I'm not so into using really bright colors to decorate my home, but I'm loving the combination of the bright with the gray. This pillow is definitely finding a home on my couch for the summer.

OK, now it's your turn! Click HERE to see this month's collage and to link up your past or present pillow projects at the Point of View Pillow Link Party!


I'm linking up...

monogram

Thursday, May 26, 2011

Portfolio Dress Features

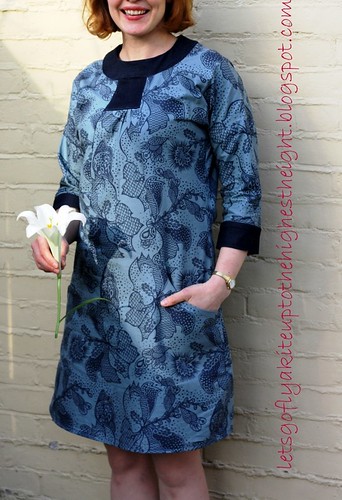
Chris and I had such a great time co-hosting the Portfolio Dress Sew Along back at the end of April. I think one of the best parts was knowing that people actually did sew along with us (yay!) and seeing all of the different version of the same pattern. I've been promising to feature these dresses for a while. I have four dresses to feature today, and here they are...

I love this version that KJ from let's go fly a kite made. The denim contrast was a perfect choice. She even made fabric-covered buttons.

Portfolio Dress

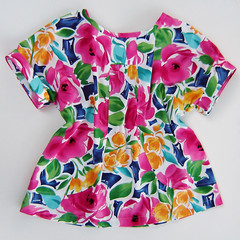
Marci Girl Designs made two versions in a tunic length. Her muslin (left) is adorable. Her second version (right) is so bright and fun. She skipped the wide neckline on this version. It's interesting how a small change can make such a big difference.

Lisette Portfolio TunicLisette Portfolio Tunic Floral

Leah from Sew Spoiled gets the award for bravery because she used a plaid! If you aren't familiar with sewing, plaid can be very difficult to work with because you need to make sure that the lines of the fabric match up when you sew each piece together. Her dress is fantastic!

Porfolio Dress (1)

Thanks to everyone who sewed along. I know there are people still working on their dresses (and several who cut everything out and never got around to sewing it togther :) When you finish, please add some pictures to the Flickr pool... we would love to see them!


By the way, have you entered my birthday week giveaway yet? It ends tomorrow, May 27th at 11:59pm (EST).

Monday, May 23, 2011

Mini Patchwork Mug Rug

Over the last couple of weeks I've sewn my first two mug rugs. I shared my embroidered log cabin mug rug last week, but the first one that I actually sewed was this mini patchwork mug rug that I made for my mother for Mother's Day.


I was inspired by this mug rug that I saw on Pin.Sew.Press. If you haven't already noticed, I have a bit of a thing for linen. I'm not crazy about the fabric I used for the binding. I wish I'd gone with something different.


I'm kind of digging mug rugs right now. They're like mini quilts, and they're good practice while I'm learning about straight line quilting.


On another note, I'd like to take this opportunity to extend a great big thank you to everyone for your kind comments during last week's It's My Party and I'll Craft if I Want To event. I can't wait to do it again next year. If you haven't already, make sure you enter my birthday week giveaway. The giveaway ends this Friday, May 27th at 11:59pm (EST).

giveaway,gwenny penny

And a reminder that this month's Point of View reveal will be this Friday, May 27th. The theme for May is pillows, so get your pillow projects (past and present) ready to link up at the Point of View pillow link party at the end of the week. (If you're new here and haven't heard of Point of View, click here for all the details.)

Thanks so much for stopping by today. I can't believe Memorial Day weekend is coming up already! Summer is right around the corner. It seems like spring just got here!


I'm linking up...

Get Your Craft On TuesdayPhotobucket

Friday, May 20, 2011

A Giveaway! - It's My Party Day 5 (CLOSED)

This giveaway is now CLOSED. Thanks for entering!

Let's wrap up birthday week with a gift for one of you, shall we? Today Amy and I are each hosting a giveaway on our blogs as part of our week long It's My Party and I'll Craft if I Want To event.


I had a great time this week sewing projects just for me as a birthday gift to myself. I shared my 241 tote, my patchwork camera strap cover, my scrappy pin cushion/organizer, and my embroidered log cabin mug rug. Now it's time to give a gift to one of you! There's a really great package of goodies up for grabs. Are you ready?


Lots of great stuff included in this giveaway. Doodle Stitching: The Motif Collection is an amazing book of over 400 easy embroidery patterns and 17 embroidery projects to make. It even includes a CD of the designs. I love these embroidery designs. I used them on my Spring Embroidery Hoop Wall Art and my Log Cabin Mug Rug.


Next up is a handmade zipper pouch that I put together using Vanessa's tutorial over at LBG Studio. I love the colors on this. The pouch is roughly 7.75" by 3.75".


Remember my Central Park Baby Quilt that I made for my sister-in-law's baby shower? I managed to get my hands on another Central Park by Kate Spain charm pack just like the one I used for the quilt. These precuts are getting more and more difficult to find. Wouldn't it be nice to win some of this fabric?


Next up is a journal. It would be great for writing down project ideas. It even says "create" on the cover. The journal is printed with soy inks by an ecologically minded company called Green Inspired.


There is also a really neat little booklet of tags that could be used for scrapbooking or other projects. I'm kicking myself for not having bought an additional pack to keep!


And just for fun I'm throwing in a few packs of buttons. The flower shaped buttons are the type that I used on my Spring Embroidery Hoop Wall Art.


So how do you go about entering to win all of these goodies, you ask? Here's the lowdown...

This giveaway is now CLOSED. Thanks for entering!

MANDATORY ENTRY 
You must be a follower of my blog via Google Friend Connect in order to enter. {UPDATED 5/27/11: Due to a Blogger glitch, my follower widget has disappeared :( Apparently this is an issue on many blogs right now. If you would like to start following my blog so that you can enter the giveaway, you can start following me if you go to your Google Reader and add Gwenny Penny. Sorry for the inconvenience.} If you are a follower, leave one comment telling me your favorite cake/frosting combo (I'm not a fan of cake... I always have an ice cream cake on my birthday :)

EXTRA ENTRY
If you are a follower of Amy's blog, Ameroonie Designs, leave me a comment telling me so.

This giveaway is open until Friday, May 27th at 11:59pm (EST). I will ship internationally, so everyone is welcome to enter. I will select one winner using a random number generator. Please, please, please leave your email address in your comment if your email is not linked to your Blogger profile! If I haven't heard from the winner by Wednesday, June 1st at 7:00am (EST), I will select another winner. Good luck everyone!
___________________________________________________________________

After you enter my giveaway, go check out the fabulous goods Amy is giving away today...


And today is Amy's actual birthday... Happy Birthday, Amy!
___________________________________________________________________

Thanks so much for celebrating my birthday with me all week long. And an extra huge thank you to Amy for putting this whole week together with me. You're the best :) It was a lot of fun, and we are definitely doing it again next year!


Related Posts with Thumbnails